

*.gcdn.co target shown in the CDN resource’s Setup guide.
WP Super Cache plugin setup
WP Super Cache adds a WP Super Cache item under Settings after it is activated.1
Open the plugin installer
Log in to WordPress admin (
example.com/wp-admin) and navigate to Plugins > Add Plugin.2
Install and activate the plugin
In Search Plugins, enter
WP Super Cache. On the WP Super Cache card by Automattic, click Install Now, then Activate.WP Super Cache CDN settings
Simple CDN is the WP Super Cache form used with Gcore. It replaces origin hostnames in static file URLs with the value in Off-site URL.1
Open Simple CDN
Navigate to Settings > WP Super Cache and select the CDN tab. Gcore settings are in the Simple CDN section.
2
Enter the custom domain
Fill in the Simple CDN form: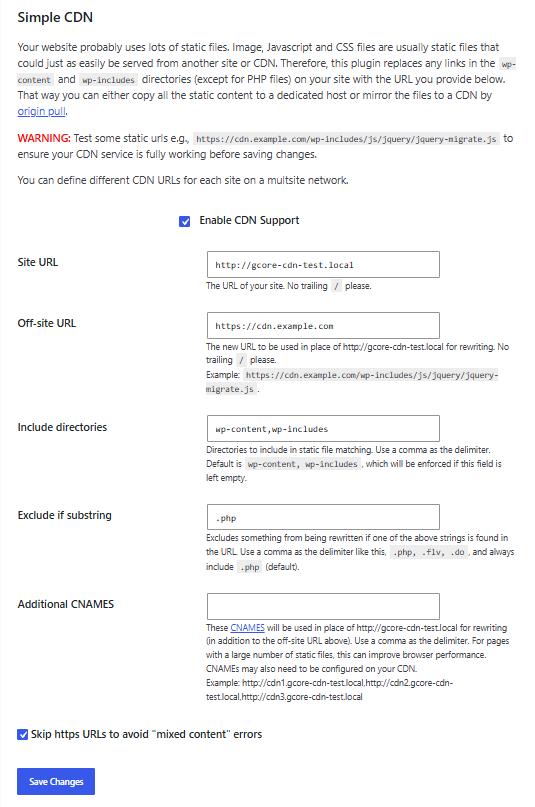
- Select Enable CDN Support.
- Leave Site URL as the WordPress origin URL, with no trailing slash.
-
In Off-site URL, enter the custom domain from the Gcore Customer Portal (CDN > CDN resources), including the
https://scheme and with no trailing slash. Use the custom domain (cdn.example.com), not thegcdn.cohostname. - For HTTPS WordPress sites, use an HTTPS custom domain with a valid certificate so all assets are rewritten to CDN. If the CDN domain does not yet have a certificate, select Skip https URLs to avoid “mixed content” errors as a temporary fallback — this keeps HTTPS origin URLs unmodified and effectively disables CDN rewriting for HTTPS assets until the certificate is in place.
- Click Save Changes.
- In Settings > WP Super Cache, open the Contents tab. Under Delete Cached Pages, select Delete Cache to clear existing cached HTML. Otherwise, cached pages continue to use origin URLs.
3
Confirm CDN delivery
Open the site in a logged-out private browser window. In browser developer tools, open Network, disable the browser cache, and reload the page. Static files should request the custom domain instead of the origin hostname. Select a cached asset and confirm that a repeated request returns
HIT in the Cache response header.